Wednesday, December 12, 2012

Wine Wednesday: Sycamore Canyon Sparkle

Well, would you look at that, it's Wednesday.  And you know what that means.  Wine Wednesday!  I apologize for the absence in WW posts lately, but that just means I have a few special bottles saved up for you guys.
Beautiful Sedona
While my mom was visiting, K and I took her up to Sedona.  It really is such a beautiful place and shouldn't be missed.  While we were there, we checked out a wine shop I have had on my list for awhile, The Art of Wine.  The place has rave reviews for its "art" and its wine.  I didn't have a chance to really look at the art, but it looked like the same kind of stuff you find in most upscale tourist towns.  Brightly colored paintings, many of them wine themed, plaques with cutsie little sayings on them.   The shop was cute enough, although on the expensive side.  Their wines are overpriced in my opinion, but I guess that is what you get in the super touristy area of a super touristy town.  It carries only wines made in Arizona.  However, I realized that some of their wines are made in Arizona, but the grapes are actually grown in California.  I think it's a little bit of a stretch to call it an Arizona wine when the grapes aren't even grown here, but I guess that is done sometimes. Honestly, I wouldn't go out of my way to visit this shop again, but if you are nearby and want some wine it might be worth checking out ( if you are prepared to spend some money).
Sycamore Canyon Sparkle - goes well next to my coffee maker, no?
One of the bottles that we ended up picking up was this sparkling wine by Sycamore Canyon.  Apparently it is sold exclusively at this wine shop.  The bottle is pretty, though, isn't it?  And it is delicious.  The sommelier described it as "pecan pie in a glass".  I wouldn't go that far, but it is sweet with strong vanilla flavors.  Even though it is sweet, it isn't overly so.  I like moderately sweet wines, and my mom doesn't like sweet wines at all, but we both enjoyed this wine.
A toast to the new house!
Apparently this can only be purchased at The Art of Wine, so if you want to try it you will have to go to Sedona.  Although I did find a website where they have an online store "coming soon", so you may eventually be able to buy it online.  I would call this a good special occasion wine, both because it is a higher price than I would normally pay, and because, well, it's a sparkling wine.  So if you find yourself in Sedona and you want to toast with a special bottle, this might be the one for you.

Wine:  Sycamore Canyon Sparkle 
Year: 2011
Region: California, Arizona
Purchased From: The Art of Wine, Sedona
 Price: $35
Verdict: 4/5
Just caught the sunset walking out of Art of Wine - this is from their parking lot

Pin It!

Monday, December 10, 2012

Merry and Bright

I love decorating for Christmas, and since we are in a new house I have all kinds of new places to decorate.   We have this half wall in our entryway that is part of our staircase, and I decided that this year it is the perfect place to hang our stockings.  Above the stockings I hung a little string garland to hang Christmas cards using clothespins.  It looked a little off when I first finished it, so much so that I texted a picture of it to my BFF and my cousin to ask it if was ugly or cute.  They both assured me it was cute (as is their duty), and  my BFF suggested adding some greenery.  I had already been wanting to make a swag that I saw on pinterest, so I decided to go all out and try to make a garland as well.
Inspiration photo from Better Homes and Gardens
When we bought our Christmas tree at good old Home Depot, they had a basket full of extra tree branches free for the taking.  My mom and I gathered up a bunch of them with the intent of getting crafty, but I didn't get around to it until today.  I had also picked up some other supplies at Joann's and Michael's.  After gathering all of my supplies, and digging my hot glue gun out of a drawer, I realized that I had a hot glue gun with no glue sticks.  I have had it for years, but never actually used it.   I attempted to finish using just regular craft glue, but it was a no-go.  So, off to Joann's I went, where I acquired some glue sticks as well as some green floral rope for the garland I would make.

After that short little field trip, I returned home to finish my first project, a greenery bunch to attach to my banister.  I just arranged some clippings of the evergreen branches and bound them together using 26 gauge green floral wire (It is just what I had on hand, but I think any floral wire that is easy  to wrap around your greenery and cut should work).  I then arranged a smaller bunch and attached those sticking out in the other direction so that there would be some greens on the bottom.  I used a small bunch of bare sticks as a backbone, but I think that is optional.  I just liked the way it looked in the inspiration photo.  I clipped apart some floral sprays that I bought at Michael's so that I could arrange them on top of the greens and attached those with more floral wire.  I then tied a ribbon around it and tied it in a bow.  The bow was not cute.  I even watched a Martha Stewart Tutorial on "How to tie a bow" (for real).  That helped, but it was still not a great bow.  But luckily, I hot glued some glittered pine cones and mini Christmas balls in the center to finish it off (and hide my pathetic bow).  I ended up being really happy with how it turned out.

I wrapped the post to protect it before hanging the swag

Next, I attempted to make my first ever garland.  It was actually really hard to find a good tutorial on how to make one, but I finally found THIS one.  I pretty much followed her instructions exactly except that I did it inside and I only used one type of evergreen.  After I finished the basic green garland, I attached it to the top of the half wall with thumbtacks ( maybe not the most secure method, but I am trying to avoid leaving a bunch of holes in the wall, and it works).  I wound a string of lights through the greens and then tucked sprigs of pine cones and berries into the greens.  The strand of lights I used was a little too long, so I put the leftovers in a clear vase next to two other clear vases filled with Christmas balls and glittered pine cones.


The supplies I used for the garland and swag are:

1 bunch of branches (from Michael's - if you live somewhere with trees you can just go cut some down)
6-8 leftover Christmas tree branches
2 glittered mini-pine cone sprays (cut apart)
2 golden berry spray (cut apart)
ribbon
mini Christmas balls ( I only used 4)
3 medium pine cone sprays
26 gauge green floral wire
Green rope (mine was wired, but I don't think that is necessary)
wire cutters/garden shears
Hot glue gun
1 strand of clear Christmas lights

Everything I either had on hand or picked up at craft stores.  I'm so happy with how these projects turned out! Although making something like this can seem daunting, it actually was fairly simple and and fun. Once you have all the supplies they don't even take that long. Happy holiday crafting!
Pin It!

Friday, December 7, 2012

The lazy person's guide to keeping your house clean(ish)

Now that we are getting settled in, I am trying to return to the normal routine that we had established of cooking at home, planning our meals and having a cleaning schedule.  A cleaning schedule!  What are you, thirty?  Yes, I am.  Thirty-one, actually.  See, I am naturally not a tidy person.  I like things to be clean, but I hate cleaning.  When I first moved to Portland, I moved into a house with two other roommates.  They already had a chore chart, and asked if I would be OK with that.  And I found that having a chore chart really helps me to stay on top of keeping the house clean(ish).  Of course, it helps when you have roommates and so only have one major chore a week.  In that house we used a whiteboard calendar that we filled in every week.  Each roommate had their own marker color and had a different chore assigned each week.  For example, one week would be floors, one week would be kitchen and one week would be trash.
I think this is exactly the same calendar that we used


 This works well for roommate situations because it leaves little room for resentment from one person doing all the chores and another never doing any.   After living with the chore chart for awhile, I decided it was the best way to keep myself on top of housework, and I thought I would probably try to continue to have a chore chart even after moving out.  K also really liked our chore chart, so we decided to keep one after we moved in together.  We assigned chores to ourselves according to our schedules, but instead of using a white board, we use our iCloud calendars.  This is great because you can keep calendars for different people or events, and you can access it from your phone or a computer so you pretty much always have access to it.  Each of us has our own chore chart, and we also have a general calendar to schedule things that we do together like events we are going to, people visiting, etc.
 

  Since I am not working right now and have more free time, I figure I can at least attempt to keep the house clean (easier said than done).  I kept seeing these things on pinterest that were links to blogs saying "Clean your house in 15 minutes a day!".  So I based my current cleaning schedule on THIS one.  Honestly, I don't know if I am just a slow cleaner or what, but it is at least half an hour to an hour per day, who are they kidding with 15 minutes a day?  To be completely honest, I am not very good about sticking to this 100%, but having it written down reminds me that it hasn't been done in X amount of time and needs to be done.  This can also be adjusted to your own personal needs or preferences.

Monday: Dust
Tuesday: Sweep and mop tile
Wednesday:  Clean out fridge, deep clean kitchen
Thursday: Clean downstairs bathroom (half bath)
Friday:  Clean master bath

K has take out trash, vacuum carpet and clean second bathroom.  Dusting and cleaning the half bath take the least amount of time, those can probably actually be done in 15 minutes.  I added the cleaning out fridge and moved kitchen to Wednesday since we moved into this house because we now have to keep our trash cans in our garage.  I don't want to throw out stinky food and have it sitting in the garage for 5 days.  Wednesday night is when the trash goes out, so that is the best time to do it.  Keeping up with cleaning out the fridge once a week will allow us to avoid any gross situations in there and help us to avoid food waste by keeping tabs of what is in the fridge that needs to be used up.  Plus, I really love my new fridge and I want to keep it nice!  (Nothing like deep cleaning your old house when you move out to show you how gross you are!)
Fancy new fridge

The most important chore that I have started doing is in my kitchen.  Although I am lazy when it comes to cleaning, I HATE a messy kitchen.  Drives me nuts.  And I felt like I was constantly cleaning the kitchen, especially since we cook at home so often now.  I was facing a pile of dishes and messy counters everyday, and it seemed to take me about an hour to clean my kitchen daily, only to mess it up again at dinner.  So, I started a daily routine that helps me immensely IF I stick to it.  If I skip one day it messes up the whole thing and it takes me a day or two to get back on schedule.  It is fairly simple, and might be a "Duh" moment for some people who already do this, but for procrastinators it will be a life saver.  In the morning, while I am brewing my coffee, I unload the clean dishes from the dishwasher and quickly load the few stragglers from the night before and that morning.  Then the dishwasher is empty and accepting dirty dishes, so throughout the day if I dirty a dish it goes directly into the dishwasher.  After dinner, leftovers are packed into lunch sized portions for the next day,  all dishes are loaded into the dishwasher, and counters are wiped (takes less than ten minutes).  I set the dishwasher to run overnight as it has a delay button, but you could run it right away.  The point is that the dishes should be clean the next morning so that you can unload them and start over.  This takes a little discipline because doing a chore first thing in the morning before you have even had coffee is not the most fun thing in the world, but it is REALLY not hard, and it makes a huge difference in the amount of time spent cleaning up for the rest of the day.  Also, I really like walking into a clean kitchen, which happens most of the time now!

Basically, regular maintenance is your friend.  As a procrastinator, I often avoid doing something for as long as I can.  The problem with that is that often I have twice as much work when I finally get to it.  After cleaning up, it is best to KEEP it clean, instead of putting it off until you can't stand it anymore.  And yes, those type As out there already know this, but this guide is not for you.  We all know you have no problem keeping your house clean.
Pin It!

Thursday, December 6, 2012

Three Weekly Recap

Oh wow!  I just took a big long unscheduled break from blogging, didn't I?  I apologize to my many readers ( Hey C!).  I do have an excuse of sorts - we finally moved into our new house!  Yay!  So, we were without internets for almost a week - I know, the horror!  Two days after moving in, my parents arrived to have Thanksgiving with us and help us get settled in.  Then the next day my back went out and I was essentially out of commission for about three days. And on and on and on.

  Thanksgiving went relatively smoothly considering that I was injured and couldn't bend or lift anything.  Oh, and that only half of the kitchen was unpacked and we had to keep looking for things "Where is my measuring cup!?!  Where is my meat thermometer?"  and so on.  I wanted to try an unconventional turkey recipe that involved cutting it into pieces, so K did his manly duties and butchered the turkey into quarters (or something, I don't know butcher lingo).  It was manly, I tell you.  Also, we decided that next year we will go back to roasting a whole turkey, the way it should be done on Thanksgiving.

Aromatics

Deconstructed Turkey

My pie crust turned out waaaay too dry and could not be rolled out, so I had to press it into the pie pan.  Then I opened the can of pumpkin puree and it had a big black spot on it.  Panic!  But the pie was saved, because I had roasted a pumpkin that we got in our CSA earlier in the month, and frozen the puree.  It turned out to be one of the best pumpkin pies I have made ( although, admittedly, not the prettiest).

Ugly Pie, tasted great
Ready to eat (finally!)
 Much work was done on the house, my Step-dad installed my new chandelier for my closet!  Yay, it looks amazing.  He and K also put in our new garbage disposal, and we finally had our blinds installed, so we are not on display to the entire neighborhood anymore.
Imagine the sound of angels

Chandelier in the walk in!  Makes me happy every time I see it.
We also got our Christmas tree up and decorated.  When we first moved here, I was convinced that we would need to buy a fake tree, as I imagined that trees would be super expensive here.  Growing up in Alaska, almost everyone had fake trees because the real trees had to be shipped up from the lower 48 and were very expensive (unless you went with a true Alaskan tree, which are quite scraggly).

I asked my Alaskan friends to send me pictures of real Alaskan Christmas trees and my friend Sandi sent this one.  Ha!
My friend Alisha shared these pics of the tree her family had a few years ago.  Check out her awesome blog HERE!

A Real Alaskan Christmas Tree 
After living in Oregon for years, however, I got used to having a real tree.  And became very anti-fake tree.  I used to go to a tree farm where you could cut down your own tree, and I loved that.  I love establishing traditions that you can do every year with your family.  Although this year we didn't so much go to a tree farm as we went to Home Depot for our tree (Home Depot has become our home away from home) - we were still able to get a real tree!  I was so excited to have my parents here to help with the tree because to me, the fun part about getting a tree is making it a memorable outing and then decorating it together.  Since they won't be here for Christmas, it is a nice way to get to do some celebrating with them.

Tree!

 After the guys got it set up in the stand, we pulled out all of the Christmas boxes front the garage.  APPARENTLY some people think I have too many Christmas decorations.  I don't really know what they are talking about, I think I have just the right amount, but whatever.  The nice thing is that I was able to pick and choose my "theme" this year since I have built up a nice collection of ornaments (The one and only benefit of working retail.  25% discount plus 50% clearance (and sometimes 75% and sometimes even 90%)?  I have a lot of nice ornaments that I got on the cheap).  Since we are now living in the Valley of the Sun, I wanted to create some sort of wintery feeling in the house.  So I went with white, silver and gold for the tree.  I love it!  I have slowly been trying to get the rest of the house decorated, still working on it.

Wintery
But now we are fully moved into the new house, our guests have returned home, and so we are trying to return to the routines we had established in the past few months.  Cooking at home, meal planning, cleaning schedules... yes, we might be becoming adults.  Of course, our house is still filled with unpacked boxes, so I wouldn't bank on that yet.
Pin It!

Wednesday, November 14, 2012

How to host the (almost) perfect Thanksgiving: A Beginner's Guide

I love Thanksgiving.  I have been hosting Thanksgiving since I was in college, and it is one of my favorite holidays because A)  I love food. B) I love entertaining C)  I love having my friends and family together.  This year will be a small shindig with just me, K and my parents, so this will be a simpler, low key holiday.  I've been thinking about what it takes to host a successful Thanksgiving dinner.  The main thing is to keep your stress levels low so that you can enjoy the holiday with the important people who are there.  If you do a little planning and think about ways to make it easy on yourself you will have it in the bag.

The first step is planning your menu.  If you are new to hosting big holiday meals, the best plan is to keep it simple.  Choose easy recipes, and try to make sure at least a few of them can be made ahead of time.  Here I will post links to some of my favorite recipes for Thanksgiving.  Unless otherwise noted, none of the photos are mine, and if you click on the photo it should take you to the original recipe   I will start with my favorite turkey recipes:

This Roasted Turkey from Martha Stewart was the first turkey I ever made.  It is simple and easy but delicious.
Roasted Turkey from Everyday Food

This Roast Turkey with Sage was the next turkey I made, and I continued to make it for several years.  It is almost as easy as the first turkey, but it is more impressive due to the herbs under the skin. (NOTE:  I realized that this recipe is incomplete on the Martha Stewart website, so I replaced the link with a very similar recipe   I am researching the original recipe to see if I can find it and repost it, because it is a really good one)

Roast Turkey with Sage from Everyday Food
This last Turkey was one that I attempted after I had a few Thanksgivings under my belt.  If you have never made a turkey before, I would go with one of the above recipes   But if you feel confident in your turkey roasting abilities, this is a really amazing turkey.  I think it is the best turkey I ever made.
Maple-Syrup Glazed Roast Turkey with Riesling Gravy from Martha Stewart Living
This is my own turkey when I used the above recipe   The setting might not be quite as gorgeous as Martha's, but I was really proud of this one.
I've never been a big fan of gravy, but it is nice to have, and most people will want it on their thanksgiving plate.  I would really recommend the riesling gravy that goes with the maple syrup roasted turkey above (even if you don't make that turkey).  HERE is also a really easy recipe.

While we are talking turkey, there are a few tools that you will need to make roasting a turkey easier.
1.  Roasting Pan with a rack - My first few years I used a tin foil, disposable roasting pan.  That will work, but your life will be WAY easier if you invest in a roasting pan.  I use mine all the time, not just for turkeys.
2.  Digital Thermometer - I love mine, and again, I use it often, not just at Thanksgiving.  You can set an alarm to go off when the meat reaches a certain temperature   That way, you don't really have to worry about it being under or over done.
3.  Kitchen Twine - for trussing your turkey, to help it cook evenly and keep its shape.
4.  A platter large enough to serve your turkey.  Nothing like scrambling at the last minute to find something to serve it on.  You worked hard on that turkey, and you are going to want everyone to admire its beauty.
5.  A knife sharp enough to carve your turkey.  Most people have this, just make sure that you do.

My turkey, ready to be roasted, using 3 of the 5 essentials - roasting pan, thermometer and kitchen twine (notice how my kitchen is a mess?  Yeah, that's going to happen)

If you don't know how to truss a turkey, check out this video.  It is really easy.


OK, now that you know what you are doing for the turkey, it is time to decide what else you want to make.  The secret to a stress free Thanksgiving?  Delegate.   Do NOT try to make everything yourself.  You will freak out.  I usually make the turkey, gravy and stuffing the day of and make the pumpkin pie and cranberry sauce the day before.  The rest I assign to other people.   This is especially true if you are hosting a crowd and everyone wants their own special tradition represented.  Someone just needs to have the green bean casserole?  Tell them you would love it if they would bring it.  Same with mashed potatoes, sweet potato casserole, bread or rolls, and anything else that a guest might ask you about.  If someone asks what they can bring, give them one of the above items.  Decide what you want at your thanksgiving table, and then make sure that everything is accounted for, by either you or a guest.

 Here are some of my other favorite recipes:

Be sure you buy (or make, but I buy) a few extra containers of chicken stock for this stuffing.  I always run out.
Simple Stuffing from Everyday Food
The easiest cranberry sauce.  Make this a day or two ahead and refrigerate.  One less thing for you to do on T-day.
Basic Cranberry Sauce from Everyday Food
These Parsnip Smashed Potatoes are a new favorite, and they are really just incredible.  They also happen to be vegan (but if you aren't vegan, don't let that scare you.  They are delicious) .
Smashed Parsnips and Potatoes with Thyme from Martha Stewart
Another thing that can be made ahead is the pumpkin pie.  Again, this is a really easy recipe and doesn't take long at all.  You can cheat and buy premade pie crusts (I do that often if I am busy or overwhelmed), but the dough recipe included is also super easy and can be made ahead and frozen.
Pumpkin Pie from Everyday Food
Of course, don't forget that people will be thirsty.  Many people have traditional thanksgiving drinks, for example I always feel like I need to have ginger ale on hand. Depending on the type of crowd you are serving you can decide what is best, but I think it is always a good idea to have a few non alcoholic choices and a few with alcohol.  An example list (you wouldn't necessarily want to have everything on the list, unless you are going to have a large crowd, but choose at least 1-2 of each) :
Ginger ale
Soda (diet coke in my house)
Cranberry juice
Apple cider
Wine
Beer
A specialty cocktail (Like This one or this one)

This year I have been seeing crock pot apple ciders all over pinterest, and so I think I am going to mix up a batch Thanksgiving morning to have available all day.  I have never made it before, but my cousin made this one for a party and says it was delicious.  She kept a bottle of spiced rum next to the pot so that people could make themselves a grown up version if they wanted.
A few more (again, I can't speak to how good these are since I have never made them):
Hot Spiced Cider - She also has a ton of cute, shabby chic fall decorating ideas, so you have to scroll down quite a ways before you get to the cider recipe.  

It is also a good idea to have a few appetizers out for people to nibble on throughout the day.  Nothing too heavy - people should be hungry for the big dinner.  But I learned that if you starve people all day, they do not have much patience if dinner is running late - and it will almost always be running late.  Things never go exactly according to plan.  Some easy choices are
Cheese and crackers
Nuts
Fruit/raw veggies

And maybe ONE easy hot appetizer - go easy on yourself, and remember your oven is busy!
A quick and easy one is Bacon Wrapped Dates.  Another is Pear Brie Tarts

Pear Brie Tarts made by me

Pear Brie Tarts
I learned this from my friend Nancy (the one who taught me about Martini Friday)
They are easy, delicious and impressive.  My favorite combination for appetizers!
You can buy the premade phyllo dough tart shells in the freezer section.  Fill each tart with a mixture of diced pear and brie, bake until the cheese is melted and bubbly.  Remove from the oven and drizzle with honey.  Tada!
Appetizer table after being picked over
The photo above is to show you that you don't have to go crazy with fancy appetizers, but they will still be appreciated.  I also had bagels in the morning with Skinnnytaste pumpkin spice cream cheese (made the day before, of course).  

I do best with lists, so here is a simple list to follow that will make your Thanksgiving more manageable.

1.  Make a Meal Plan
2.  Plan your guest list and assign dishes out as needed
2.  Collect all of your recipes in one place  (include appetizers and drinks)
3.  Make a shopping list from your recipes, also non food items such as cooking utensils and table settings.
4.  Go shopping a few days before to avoid the crowds.
5.  Make a list of what order to cook things (what can be made ahead?  How long will the turkey take?  If your turkey takes 4 hours, how long do your other dishes take?  When should you start them?)
7.  Tuesday and Wednesday, make everything that you can make ahead of time.
6. Thursday:  Keep calm and follow your list.  Assign other people to tasks as needed.  Remember that things probably will not go perfectly, and that is OK.  The point of this holiday is to spend time with people you love and create memories.

You may also want to have some games or movies on hand for the post dinner food coma.

Happy Thanksgiving!
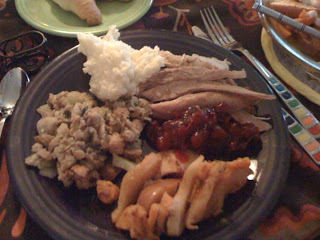
My Thanksgiving dinner, 2010

Pin It!

Tuesday, November 13, 2012

DIY: Painting a walk in closet

How was everyone's weekend?  It appears that winter has come to Phoenix, maybe!  That's right, I was just writing about how we were out of the 100's and fall was coming, but this weekend we had unusually cool weather, and even had a severe weather alert about it.  I'm serious.  My weather app had that ominous red exclamation point, warning me that temperatures would be in...the sixties!  But wait!  It actually dipped into the thirties overnight.  This is saying something because six weeks ago it was staying in the nineties overnight, which means that it NEVER COOLED OFF.  So now, the entire city is freezing and wearing coats.  I'm just glad that I get to wear long pants, and we finally FINALLY got to leave the AC off for an entire day.  So, we survived the winter freeze of the desert and should be back in the seventies, or possibly eighties this week.  And it's a good thing, because my parents are coming to visit next week, and they are expecting some sun after hearing me bitch about how hot is it here for six months.

Oh yes, did I forget to mention that I am the crazy person who is moving into our house this weekend and hosting Thanksgiving dinner there next week?  I like to keep things interesting like that.  Last year I hosted a ginormous Thanksgiving dinner while working, taking A&P and being immersed in an epic romance, so I'm pretty sure I am up to the challenge this year while all I have to do is move a household beforehand (oh, still in the epic romance, but this year only introducing him to one family member instead of, like, seven).

So, K and I have been scrambling to get ready for our move, because apparently we were in shock for the first two weeks after closing on our house and didn't do anything.  When we did our final walk through of the house, I noticed that the walk in closet that took my breath away was in desperate need of being painted.  Why paint a closet, you ask?  Why not, I ask you.  But actually, the thing clearly had not been painted ever, it was still that stark builder white, and on top of that it had tons of ugly scuff marks and smudges all over the walls.  And rather than paint it white, or tan, or some other neutral, why not paint it a fun color?  I love to decorate with lots of color, but there is something intimidating about painting an entire room a bold color.  It is really a commitment, and then it dictates everything else that you put in the room.  I have always thought that it makes sense to paint smaller rooms, like bathrooms, those fun colors because smaller room = smaller commitment.   Plus, you aren't really putting much furniture in there.  Thus, the turquoise walk in closet was born.
Walk in closet - you can't tell, but the walls are gross

Before purchasing house:  Oooh, walk in closet!  After purchasing house:  Ewww, what's that on the wall?

I think K might have thought I was crazy when I first suggested turquoise, but he indulged me. And so when we were in Home Depot picking out blinds this weekend, we stopped by the paint department and loaded up on supplies.
I chose the lightest color because it is a small space

Supplies
One Gallon of BEHR PREMIUM PLUS ULTRA® Satin Enamel in Gem Turquoise
One starter kit of paint supplies - contained one roller, a mini roller, an angled brush, and a paint tray
One Handy Cup ( a life saver)
Blue painter's tape
A plastic sheet for a drop cloth
a flat head screw driver (we forgot this)
paint stirrer 
One step ladder
One super awesome boyfriend  

A few notes.  

A. The paint was a paint and primer in one, which was awesome.  We ended up only needing to do one coat, and the color is rich and beautiful.  

B.  The brush kit we bought was the "best" quality (Home Depot labels some things good, better, best).  I think this was a really good choice  because I have read horror stories of cheap brushes and rollers that leave fibers behind and ruin your paint job.  We did not have this problem, and our brush and rollers worked like a charm.

C.  Taping off and laying down the plastic was the worst part, but very necessary.  Do not attempt to do this without protecting your floor.  Taping helped protect the baseboards and shelving but also did not provide quite the clean edge that we wanted.  It was our first time painting a room, so there is a learning curve.

D.  Starting off in a closet is a great way to learn.  It doesn't have to be (and isn't) perfect, but that's OK!

E.  Make sure you have a step ladder and don't try to use a plastic folding chair like we did.  Also, have a screw driver handy (like we didn't).  You need it to remove light switch plates and to open the paint can.


F.  Our paint was not completely mixed, so I was glad that K had picked up a wooden paint stirrer that we could use to make sure it was totally uniform.
So pretty!  But needs mixing!
After taping off all the edges, I started painting the edges with the brush while K took the roller and covered the big areas.  Before starting, we watched this tutorial.  We also looked at one from This Old House, but it was way more detailed than we were willing to get for a closet.  No sanding here!


All taped off and ready to go!

This project took a total of about three and a half to four hours, including prep time.  Towards the end my hand was cramping up and K and I had to take quick turns finishing off the edges.  We weren't sure if we should leave the tape up overnight, but after a tip from a friend and a quick google search, we realized that you should remove the tape before the paint has completely dried.  We were not entirely pleased with how the edges turned out - there are some areas where the paint seeped behind the tape and where the edges are uneven.  I think this is more obvious since this is a bold color and is highly contrasted against the white.   Like I said, this was a good learning experience for us, and since it is a closet I am not going to get nit-picky.  


I am in LOVE with my new closet, and I think it looks about a hundred times better than before.  I am also really happy that K and I completed our first home improvement project together!  It is amazing the sense of accomplishment and empowerment that you can get from finishing a fairy simple project.  Now that we have finished this, we are thinking about other projects we might take on around the house.  Mosaic tile backsplash?
Finished product!

Pin It!

Wednesday, November 7, 2012

Wine Wednesday: Election Edition!

Actually, this post won't say much about the election, other than this is the wine that I drank while watching the election results roll in.  It occurred to me that I should have pulled out a special bottle for the occasion, but instead I just chose what was already cold in my fridge.
Robert Mondavi Pinot Grigio

Despite the notoriety of Robert Mondavi, I have never had a Mondavi Pinot Grigio.  I find that California Pinot Gris/Grigios are very plentiful, but I generally don't like them as much as Oregon Pinot Gris.  Call me biased.  This wine was fine, but I found it to be bland.  I've never found myself thinking that about a wine before, but it just didn't have much flavor or body.  It was light and pretty crisp, just lacking.  At only $8.89 for a bottle, it wasn't a huge loss, but I probably wouldn't go out of my way to buy it again.

Wine: Robert Mondavi Private Selection Pinot Grigio
Year: 2011
Region: California
Purchased From: Costco
Price: $8.89
Verdict: 2/5 
Pin It!

Monday, November 5, 2012

An Autumn Drive


Well, look at that, we made it to November.  Technically it's November anyway, we are still projected to hit ninety degrees for several days this week here in Arizona.  In the rest of the country, we had tsunami warnings in the west and a hurricane in the east.  The tsunami thankfully was a false alarm, but Hurricane Sandy has wreaked havoc on the east coast, as most of you are aware. Thousands of people are still without power and lacking vital supplies.  Relief organizations such as the Red Cross are scrambling to provide much needed shelter and supplies, but many people are still in need.  Being so far removed from the disaster, I can only imagine what everyone is going through right now. I am encouraged by the kindness and willingness to help that many people have shown during this disaster, both from people living far from it who have donated money and time to help relief efforts, to people living in disaster areas who are doing all they can to help their neighbors.  I am wishing everyone as smooth a recovery as possible.

 One of the benefits of living in the desert is that you don't really need to worry about tsunamis and hurricanes.  Actually, I think that is the only benefit of living in the desert.  Although autumn is well on its way in the rest of the country, here in Arizona it just means that we have gone from surface of the sun temperatures to regular summer weather.  Last week we did actually drop to the mid eighties, but as I mentioned before we are back into the nineties, at least for the next few days,  This is November people.  November!  Before I moved here, I thought that there would be three months of really hot weather, and the rest would be nice.  Soon after moving here, I readjusted to four months of scorching temperatures and eight months of nice weather.  Now I'm starting to think that it will be four months of nice weather and eight months of hellish heat.  In addition to reconciling that it is still almost too hot to wear jeans, I'm also missing the changing leaves.  I wasn't going to find changing leaves here in Phoenix, but I did a little research and found that a drive north could give me a fall fix.


Scenic 89A
Scenic 89A

  Last weekend K and I took a nice afternoon drive up I-17, veered over to Sedona and then drove up the Scenic 89A next to Oak Creek Canyon.  We ended our drive in Flagstaff.  Although the trees weren't quite the explosion of fall color that I was hoping for,  there were still many beautiful changing leaves, the sky was blue, the air was crisp, and I got that autumn experience I was hoping for.  After leaving Sedona and starting our drive, we stopped at a little market called Indian Gardens Oak Creek Market.  This would be a great place to stop for a bite to eat, or to stock up on snacks if you want to have a picnic.  They have a nice patio out back to eat your lunch if you want.  There is also a visitor center where you can buy day passes if you decide to do any hiking.

Indian Gardens Oak Creek Market - a great place to stop and get snacks!
Beautiful red rocks right behind the market


Later we pulled off into Oak Creek Vista.  This was a perfect place to enjoy the views.  Although this is a heavily used viewpoint,  it is a large area, so it gives you room to break away from the crowd.  Walking from the car to the view point areas, you get to smell the trees ("So much oxygen!!!").  They seem to have a little market set up with locals selling arts and crafts during the day.  The view of the canyon is really spectacular.  This is not to be missed.
Climbing in Elevation - we aren't in the desert anymore!

Ranger Station at Oak Creek Vista

Oak Creek Canyon

Oak Creek Canyon

7000 Feet!

After our drive, we rolled into Flagstaff and decided to have dinner in the historic downtown area at Criollo Latin Kitchen.  This was a great little restaurant that served latin inspired dishes with locally and sustainably grown food.  We started with the masa crusted calamari, and ordered the paella and carne asada tacos.  It really reminded me of a place that might be in Eugene.  Actually, the whole town sort of reminded me of Eugene.  K and I agreed that it had a small town yet cultured feel to it.  We also noticed that anytime we visit another town in AZ and mention that we are visiting from Phoenix, we get the same response.  It seems that many people in the state are not big fans of this city.  We usually get a polite nod or "Oh" as a response to where we are from.  When we say that we are happy to get out of the city, we get an enthusiastic response that usually amounts to "Yeah, I don't blame you". 
Trees in Flagstaff

Criollo Latin Kitchen in Flagstaff

Paella at Criollo

After dinner, we walked to a coffee shop on the next block called Rendezvous Coffee House located in a historic hotel called The Monte Vista.  We sat facing the window as we drank our coffees, watching people hustle by with their boots and scarves.  Flagstaff is nearing winter!  Many of the leaves have already fallen from the trees.  Being unaccustomed to needing to wear anything other than short sleeves, I had left my jacket at home.  Luckily, K is a gentleman and let me wear his.  After our coffee, we walked around the block to enjoy the downtown feel and cool weather.  Then we reluctantly headed back to our car to make the journey back to Phoenix.  It was around 6pm when we left, and it was 47 degrees.  Two hours later we arrived in Phoenix - and it was 74 degrees. 
San Francisco Street
The White Lady Mocha from Rendezvous
An evening walk in Flagstaff

Hotel Monte Vista


Pin It!
Blogging tips